
Does Your Back Hurt? Part Two
Last time we discussed the origins of back pain and some quick fix solutions if you have issues in this area. For this article I want to get into a bit more detail on what you can do to be more aware of your back issues and some real solutions in terms of restoring mobility and keeping your muscles firing well.
First of all, most people will tell you that the reason you have back pain is because you have a weak “core”. What does that mean?
In simple terms this means that the muscles that support your spinal column, especially as it relates to your pelvis in the lumbar area, are weak and need strength. Most practitioners will have you start to work on things like spinal bracing movements, hip stretches and lower back strengthening. However, this brings me to my first point when it comes to back pain, and one of the most important principles:
You need to know what the source of the issue is!
Imagine a person with a weak ankle due to spraining it several times as a kid. This person stops being active and loses a lot of their ability to fire their leg and back muscles, and eventually every time they take a step their body is slightly tilted to take load off the ankle. This throws off the pelvis slightly each time, and this throws the lower back out of line and therefore causes the supporting muscles on one side to fire too much. If the ankle is the source of the issue, strengthening the muscles in the midsection will help, but it doesn’t ultimately fix the problem. It’s like taking an Advil for a headache.
So rule number one is get properly diagnosed. I don’t diagnose, I tell people what in my experience things are and (99% of the time I’m right), but it is always confirmed by another party preferably with doctor in front of their name after they get referred. Many practitioners will not look past the pain area – find one that will.
I’ve had clients come in with back pain that we have resolved by treating their shoulders. Or feet. Or even simply practicing walking properly. It can be that simple.
So what is the “core”? Well, the way I explain it to clients is that you want to stop thinking of “core” and start thinking of SPINE. More specifically you want to start thinking of how it relates to your pelvis (mostly) and also things like your rib cage and shoulder complex. There’s many more muscles involved than just your TVA, or just your lower back. In the deep abdominal area alone there are five layers mostly overlapping each other. And, when you move one joint, you affect every muscle that crosses over it – and your spinal column is made up of lots of joints. If you move your hip, you’re affecting your spine. If you move your shoulder, you’re affecting your chest, back and shoulder (and a bunch of other things). Take this into consideration when performing any type of mobility movement.
Before I get into how to strengthen these areas (which will be for Part 3), I want to instead address mobility. This is the ability to move these joints without strain or compromising the muscles that control them. Typically this requires movement without a ton of load or force behind it. One of the biggest pieces of advice I can give here is:
Respect your body and allow it to move (or not move) as it wants to – don’t force it.
One major flaw people make with mobility work is that they push their muscles too hard and create even more strain. Instead of thinking of it as stretching, I invite my clients to instead think of it as allowing their muscles to achieve a longer range of motion within the involved joints. This goes across both sides of the muscle, the long and the short. If you lengthen or shorten a muscle too much, it is weak in that position and will often fire in order to try to get out of that position – which defeats the whole purpose of lengthening one side while you shorten another.
For example, if you are in a typical hamstring stretch you are lengthening the back of the leg, but you are also shortening the front (allowable to a certain extent until your knee reaches terminal extension). Always move within a point of mild resistance – never pain.
With the lower spine, the usual culprits for lack of mobility are the hip complex (especially in the front of the body) and the spinal erectors. General ranges that are restricted are spinal extension, pelvic movement, hip rotation and extension and lateral flexion (ie side bending – but be careful here – I don’t side bend anyone until they are much better).
So here are the top 5 mobility movements I prescribe to pretty much everyone with back pain as a start. Remember that as with any exercise program, a mobility program also needs to be tailored to you specifically – don’t necessarily take this as gospel. It is a good start for most of the population. As with anything else, if it makes your body uncomfortable or causes pain – DON’T DO IT.
Number One: The McKenzie position.
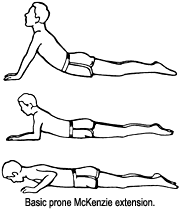
Use movement to start, but sparingly. Holding position for 5-8 minutes can be just as effective.
Stuart McGill, who is one of the most prominent back care specialists in the world advocates this as the number one movement, and I do as well. Place the hands under the shoulders and extend up, moving slowly until pressure is felt in the lower back and focus on dropping the hips into the ground. Repeat with movement but can also be done as a static hold if you have facet issues.
Number Two: Cat/Camel position

Focus on moving from the pelvis and pushing the tailbone up – repeat movement up and down.
This can also be a good transition into childs’ pose for upper back mobility. Focus on moving the entire spine starting from the tailbone, not just the upper back as many people tend to do.
Number Three: Kneeling Hip Flexor stretch with movement

Instead of holding static, raise up the same arm as the leg you have behind you and push the hip slightly forward and back, oscillating gently.
This movement may be difficult for those with knee problems. If you cannot get onto one leg a good modification is to do it standing up with one leg behind you. Oscillate the hip forward and back. Another fantastic stretch along this line is one popularized by Kelly Starrett – you can see it here but it is very advanced and should be modified for most people.
Number Four: Windshield wipers with feet on the ground

Move the knees side to side keeping the feet on the ground. I also have clients extend their arms to the sides in order to lengthen out the rib cage and pecs if they can.
For some people with advanced back problems this gets removed immediately because it can cause tilting. Also, if you have diagnosed SI Joint issues please take this one out until they are resolved. This puts rotational torque through the hips, which for many is a good thing but for some is not.
Number Five: Standing Glute/Piriformis stretch.

This can be done at work – just make sure that you don’t have any knee issues.
This movement can also be done lying down, but is more effective standing. Again as with the others, don’t hold position, lift and lower the knee until a pull is felt in the hip/glute area. If one side is tighter, do that side twice. For example, if your left is tighter you would go left, right then back to left.
This covers 85% of the bases for most people who have issues. Again, for some with severe mobility issues all of these might have to be modified. Feel free to comment or message me for modifications if you need them.
So the next question begs – how often? My recommendation is always twice a day to start, ideally morning about twenty minutes after rising so you have moved a bit and established blood flow, and then before bed or after work – whatever works for your schedule. It can be a great way to decompress at night and focus on yourself after turning off all of your electronics and is a great way to establish good sleep hygiene. Think of this as general maintenance and even just by doing these movements – within what your body will allow – you can experience some relief almost immediately if you have the beginnings of problems in your spine.
Oh, and if you tell me you don’t have time, this whole routine takes about 5-10 minutes. You have the time. You choose not to use it in the right way. Choose to help yourself.
In Part Three I will be going over exercise. Again, we often think about “core” work as something simple and straightforward but for most people finding out what area needs the most help is essential. This can allow us to build an exercise routine that will work for that individual and bring a solution to the issue. Like I said in Part One here, if you’re at Stage One then these should help a lot. Stage Two or Three might need some help. but you’re starting in the right place.
If you liked this please feel free to subscribe on my main page, comment and share on Facebook and on Twitter at @paradigmottawa. I look forward to any feedback you may have.
